Secure Checkout

Power Brake Kit w/HD Aluminum Master Cylinder | 66-77 Ford Bronco SKU: 3050

Power Brake Kit w/HD Aluminum Master Cylinder | 66-77 Ford Bronco

Power Brake Kit w/HD Aluminum Master Cylinder | 66-77 Ford Bronco

Purchase Power Brake Kit w/HD Aluminum Master Cylinder | 66-77 Ford Bronco
$374.99 SKU: 3050


"Fits 66-77 Ford Bronco"
4 Reviews

Add Stainless Hose Kit?:

Product Overview:

Ready to stop those horses with confidence? This Early Bronco Power Brake Kit featuring a dual diaphragm booster and our exclusive HD cast aluminum master cylinder is built to deliver modern braking power in a factory-fit design. The system mounts directly to your firewall with a durable black powder-coated bracket, requiring no inner fender modification. The aluminum master cylinder resists rust and corrosion, providing lasting performance and clean looks for years to come. Brake lines are optional to accommodate custom setups like brake locks, proportioning valves, or disc upgrades.

Full description

Ready to stop those horses with confidence? This Early Bronco Power Brake Kit featuring a dual diaphragm booster and our exclusive HD cast aluminum master cylinder is built to deliver modern braking power in a factory-fit design. The system mounts directly to your firewall with a durable black powder-coated bracket, requiring no inner fender modification. The aluminum master cylinder resists rust and corrosion, providing lasting performance and clean looks for years to come. Brake lines are optional to accommodate custom setups like brake locks, proportioning valves, or disc upgrades.


Early Bronco Power Brake Kit w/ HD Aluminum Master Cylinder – 1966-77 Ford Bronco

Bringing an Early Bronco up to modern braking standards starts at the firewall. This 66-77 Ford Bronco Vacuum Power Brake Conversion Kit is designed specifically for your classic Bronco and delivers noticeably reduced pedal effort, improved brake control, and consistent stopping power on the street or trail. Built around a dual diaphragm booster and a heavy-duty cast aluminum master cylinder, this setup bolts directly to the factory firewall with no cutting or inner fender modifications required, making it an ideal upgrade for stock restorations and modified rigs alike.

Pro Tip: This kit pairs exceptionally well with front disc brake conversions, providing better pedal feel and braking confidence without over-assist. You will need at least 18 in lb of vacuum for this kit to perform as intended. If you are low on vacuum, consider upgrading to an Early Bronco Hydroboost Brake Kit which runs off of the hydraulic steering pump rather than engine vacuum. While you can run this power brake kit with four-wheel drum brakes, we highly recommend upgrading at least the front brakes to disc for optimum performance and braking safety.


  • Direct Bolt-On Installation - Designed to use the factory firewall hole pattern for a true bolt-on upgrade. No drilling, cutting, or welding required.

  • Dual Diaphragm Power Brake Booster - Provides increased brake assist compared to single-diaphragm units, resulting in reduced pedal effort and improved modulation for both street driving and trail use.

  • HD Cast Aluminum Master Cylinder - Lightweight and corrosion-resistant construction eliminates the rust issues common with cast steel OE-style cylinders while offering dual reservoir safety.

  • Bronco-Specific Mounting Bracket - Black powder-coated steel bracket properly positions the booster and master cylinder for correct pedal geometry and a clean, factory-style firewall appearance.

  • Compatible with Common Brake Configurations - Works with manual or power brake conversions and is suitable for front disc/rear drum or four-wheel disc setups when paired with the appropriate proportioning valve.

  • Flexible Brake Plumbing Options - Brake lines are sold separately, allowing compatibility with adjustable proportioning valves, brake locks, or custom plumbing setups.


If you’re tired of fighting manual brakes or dealing with mismatched conversion parts, this Early Bronco power brake kit delivers a clean, proven solution. The dual diaphragm booster and aluminum master cylinder work together to provide confident braking control with reduced pedal effort, all while bolting directly to your stock firewall.

Bolt-on power brake upgrade for 1966-77 Broncos using a dual diaphragm booster and aluminum master cylinder for better pedal feel and confident stopping power.


Detailed Vehicle Fitment
Year Make Model
1966* Ford Bronco
1967 Ford Bronco
1968 Ford Bronco
1969 Ford Bronco
1970 Ford Bronco
1971 Ford Bronco
1972 Ford Bronco
1973 Ford Bronco
1974 Ford Bronco
1975 Ford Bronco
1976 Ford Bronco
1977 Ford Bronco

Additional Info

  • 1966 Ford Brocno Note: Requires updating brake hoses, lines and junction valve to support dual reservoir master cylinder. Brake pedal also must be updated to support the 67-77 Bronco brake light switch.
  • Designed for stock firewall and pedal assemblies
  • Brake bleeding required after installation
  • Typical installation time: approximately 2–3 hours with basic hand tools


Early Bronco Power Brake Conversion Installation Instructions

Early Bronco Vacuum Power Brake Kit Installation

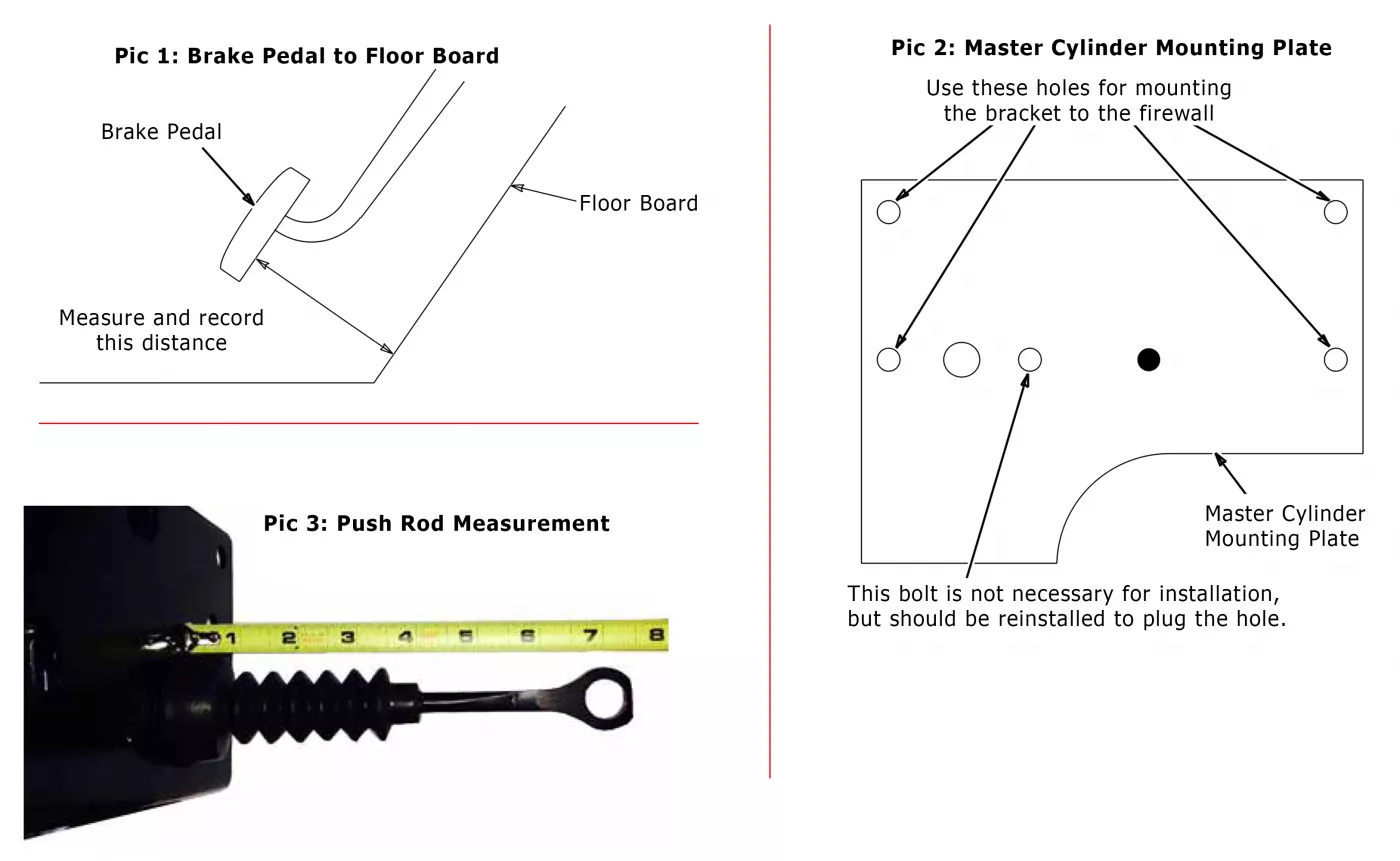
*WARNING*

Proper operation of your brakes is essential for your safety and the safety of others. All brake service should be performed ONLY by technicians experienced in the installation and proper operation of brake systems. It is the responsibility of the technician installing any brake component or kit to determine the suitability of the component or kit for the particular application. After installation and before operating your vehicle, always test the brakes function under controlled conditions.

DO NOT DRIVE WITH UNTESTED BRAKES!

Before You Start

  • Thoroughly read and understand these instructions before proceeding.
  • Brake function should be thoroughly checked and any problems corrected before the Power Brake Kit is installed. Pulling under braking, one wheel lockup, or premature rear wheel lockup indicate existing brake problems. This kit will not fix those conditions.
  • The primary function of this Power Brake Kit is to provide power assist to the existing braking system.
  • The booster operates by manifold vacuum. Adequate manifold vacuum is required: with the engine at normal operating temperature, test manifold vacuum. You need at least 18 inches of vacuum.
  • Brake hoses (master cylinder to valve) are not included. They are optional; some customers make their own. WILD HORSES offers rubber hoses or stainless steel braided hose kits separately (ask for part #3077).
  • Additional hardware not included: a vacuum port is required for the brake booster. If your engine does not have a manifold vacuum port at the rear of the intake manifold, one will need to be installed.

Installation Steps

  1. Measure the height of the brake pedal from the floor and record it: __________ inches.
  2. From under the dash, disconnect the master cylinder push rod, bushing, and brake light switch from the brake pedal, noting how it went together. Use the factory retaining clip when reinstalling the push rod, bushing, and brake light switch.
  3. Disconnect the brake lines/hoses from the master cylinder.
  4. Remove the two bolts holding the master cylinder to the firewall and remove the master cylinder. Replace the bolt on the right side (closest to the driver-side fender) of the master cylinder and tighten. (This bolt is not necessary for the installation of the Power Brake Kit, but should be reinstalled to plug the hole.)
  5. Install the brake push rod and seal through the large hole in the bracket. The seal has a groove that slips into the hole in the bracket to hold it in place. Thread the push rod into the push rod clevis. From the back of the bracket to the center of the hole in the push rod should be approximately 7". The clevis pin attaches the push rod clevis to the bracket. Do not install the cotter pin yet.
  6. Remove the four firewall bolts and position the booster bracket on the firewall. Insert the assembly through the hole in the firewall and loosely thread the bolts through the booster bracket.
  7. Four screws hold the steering column boot to the firewall. The top two may interfere with the bottom of the bracket. If the bracket does not sit flush against the firewall, remove the top two screws.
  8. Once the booster bracket sits flat on the firewall, tighten the four mounting bolts.
  9. Reinstall the two screws removed in the previous step. In some cases, relocating these screws may be necessary. Drill the mounting holes slightly lower to clear the bottom of the brake bracket if needed.
  10. Position the pedal at the height recorded in Step 1. The push rod should be close to the 7" measurement from Step 5. If necessary, adjust the brake push rod so it can attach at your recorded pedal height. Attach the push rod to the pedal with the original bushing, clip, and brake light switch. Remove the clevis pin. Bring the push rod through the firewall into the engine compartment far enough to tighten the jam nut on the push rod.
  11. Make sure the push rod is threaded far into the clevis. Reinstall the clevis pin and use the cotter pin to secure.
  12. Install the vacuum hose from the check valve on the booster to a manifold vacuum source.
  13. Using a master cylinder bench-bleed kit (or hoses routed back into the top of the master cylinder), bleed the master cylinder. Use plenty of rags to catch any brake fluid that may splash. Do not skip this step. Bench bleeding purges small pockets of air from the cylinder before bleeding the complete brake system. Keep bleeding as long as you see air coming up inside the master cylinder. Light tapping on the master cylinder with a soft rubber hammer can help release trapped air.
  14. Install hoses from the master cylinder to the valve. NOTE: The front port of the master cylinder hose goes to the front inlet on the proportioning valve. The rear port (closest to the firewall) connects to the rear inlet on the proportioning valve.
  15. Bleed the whole brake system. After bleeding, check that all bolts, nuts, pins, clips, cotter pins, and flare nuts are tight.
  16. Top off brake fluid, making sure the cap is seated properly. Check that brake lights are working properly. If you have any doubts about the installation, DO NOT drive the Bronco until the braking system has been checked and is determined to be working properly.
  17. Be very cautious on the first test drive. Test the brakes thoroughly—test and retest again.
  18. Recheck that all bolts, nuts, pins, clips, cotter pins, and flare nuts are tight and check for leaks. Fix as necessary and test again.

Shop Notes

  • Push rod reference length: approximately 7" (from bracket back face to center of push-rod pin hole).
  • Proportioning valve plumbing: master cylinder front port → valve front inlet; master cylinder rear port → valve rear inlet.
  • Minimum manifold vacuum required: 18 inHg at normal operating temperature.

Support

WILD HORSES 4x4 | 1045 S Cherokee Ln, Lodi, CA 95240 | (209) 400-7200

Parts: #3050, #3071, #3085 | Rev 2.0 (1/15/2026)

pdf-file

Quickstart Guide

Review Power Brake Kit w/HD Aluminum Master Cylinder | 66-77 Ford Bronco

California residents: Proposition 65 Warning
Questions & Answers
PRODUCT REVIEWS
Roy Belloir
Reviewed 12/18/2025
Excellent Quality!

Ryan Rosenberger
Reviewed 12/06/2025
Nice having power brakes!

Aaron
Reviewed 02/03/2025
This kit assembly has come a long way since last I looked 15 years ago or so. The bracket and booster clears my 5.0 intake perfectly and installation was super easy. Now my F&R disk brakes work great, with much better stopping power and control.

josem
Reviewed 09/18/2021
Professional and reliable service, thank you

Reviews
Shop popular categories